فارسی
فارسی


In machine vision and image processing systems, we need proper lighting for taking pictures. Without taking a proper image, we cannot process it properly. But the truth is that without proper lighting to take a photo, we are not able to process that image at all, even with most powerful image processing software !
Our experience at “Bina Pardazesh team” shows that in many cases it is impossible to carry out machine vision and image processing projects without having sufficient knowledge and expertise in the field of light. Choosing the wrong light makes coding very difficult and sometimes impossible. You can get consultation for your projects.
Unfortunately, there is no suitable reference in the field of lighting vision systems in Persian language. At Bina Pardazesh Company, we decided to teach lighting techniques, types of Machine vision lights, how to choose lights, etc. As a first step, we suggest that you learn lighting techniques.
Click here to register for the “Machine Vision Training Course with Halcon Software”.
Direct light and diffused light
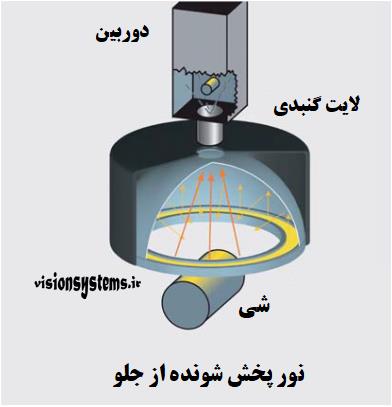
Before we go into lighting techniques, we need to get acquainted with two very simple concepts: one is direct light and the other is diffused light.
What is direct light and what kind of light is it?
If an object is close to an incandescent lamp or an LED light, we say that it is direct light. In this case, the light has a specific direction.
Suppose that a sheet of paper or a thin white cloth is placed between that object and the lamp. In this case, the light does not hit the object directly. The presence of cloth or paper breaks the light and spreads it in different directions. In this case, so to speak, we say that the light is diffused. The best type of diffused light is the dome light, where the light shines on all the details in different directions.
Training of lighting techniques in Vision system
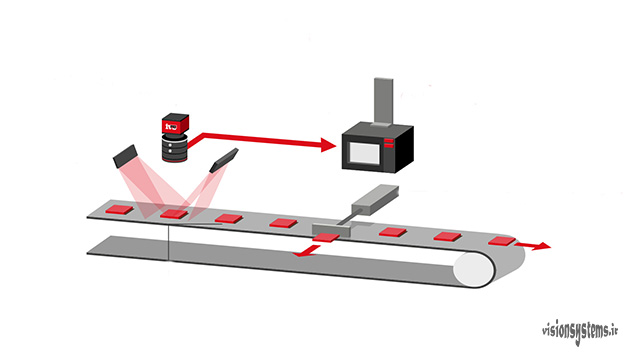
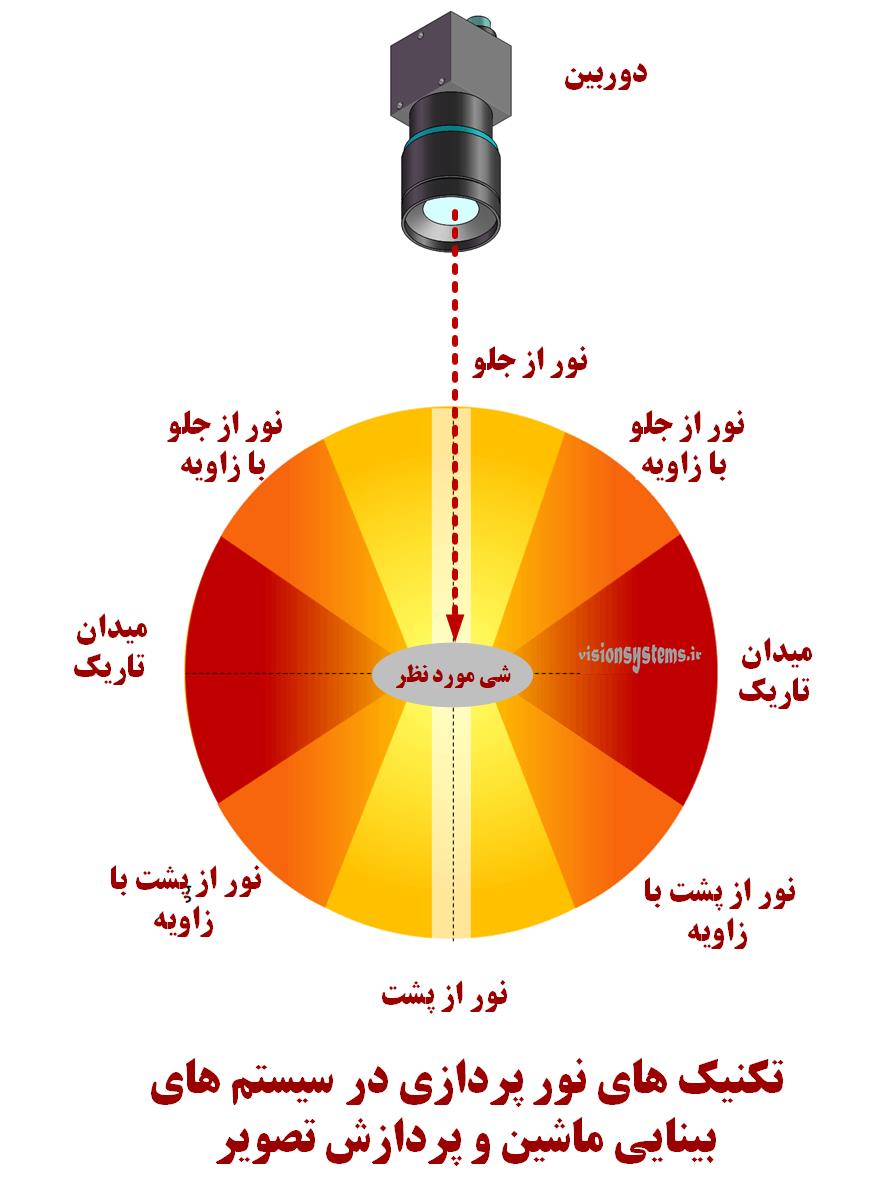
Depending on which direction the light shines on the object, the image of the object will be different. Pay attention to the figure below, the camera observes the object from above and the different lighting modes are specified in this figure.
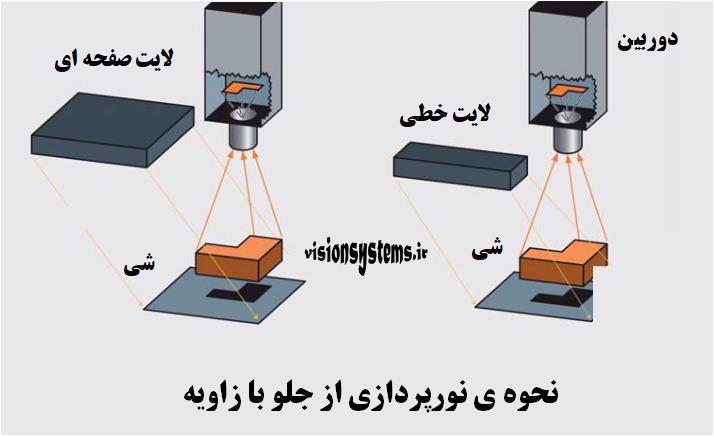
Light from the front: suppose we went to a photo shoot to take a 4×3 photo. In this case, the photographer shines the light on our face to take a picture of our face. This technique is called front light. In the picture below, the light from the front is marked with a yellow area. This method is the most common way of lighting in image processing.
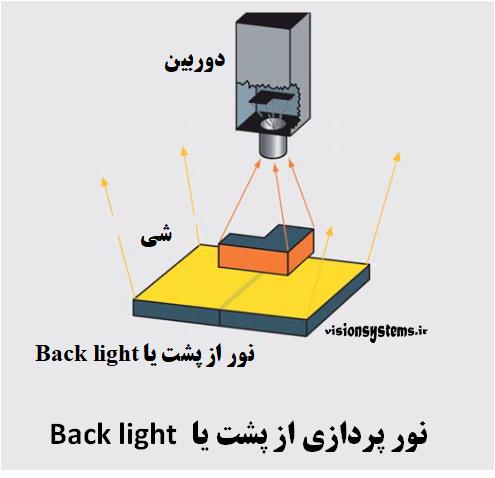
Light from behind: In this case, the camera is in front of the object and the light source is behind the object. This lighting technique is called back light. With this method, the shadow of the object will be visible in the image, and many things such as color, etc. will not be seen in the image. Of course, this method can sometimes be very useful, for example, when we want to check the presence or absence of an object in the image, or when we want to inspect a glass.
Light from the side: In the light from the side mode, the light shines on the image at a very oblique and low angle. This type of imaging is called dark field. Darkfield imaging makes edges stand out. In this method, light is irradiated at a small angle to the object (less than 30 degrees). This lighting method is used only in special situations.
The result of imaging with each of the mentioned techniques is shown in the photo below.
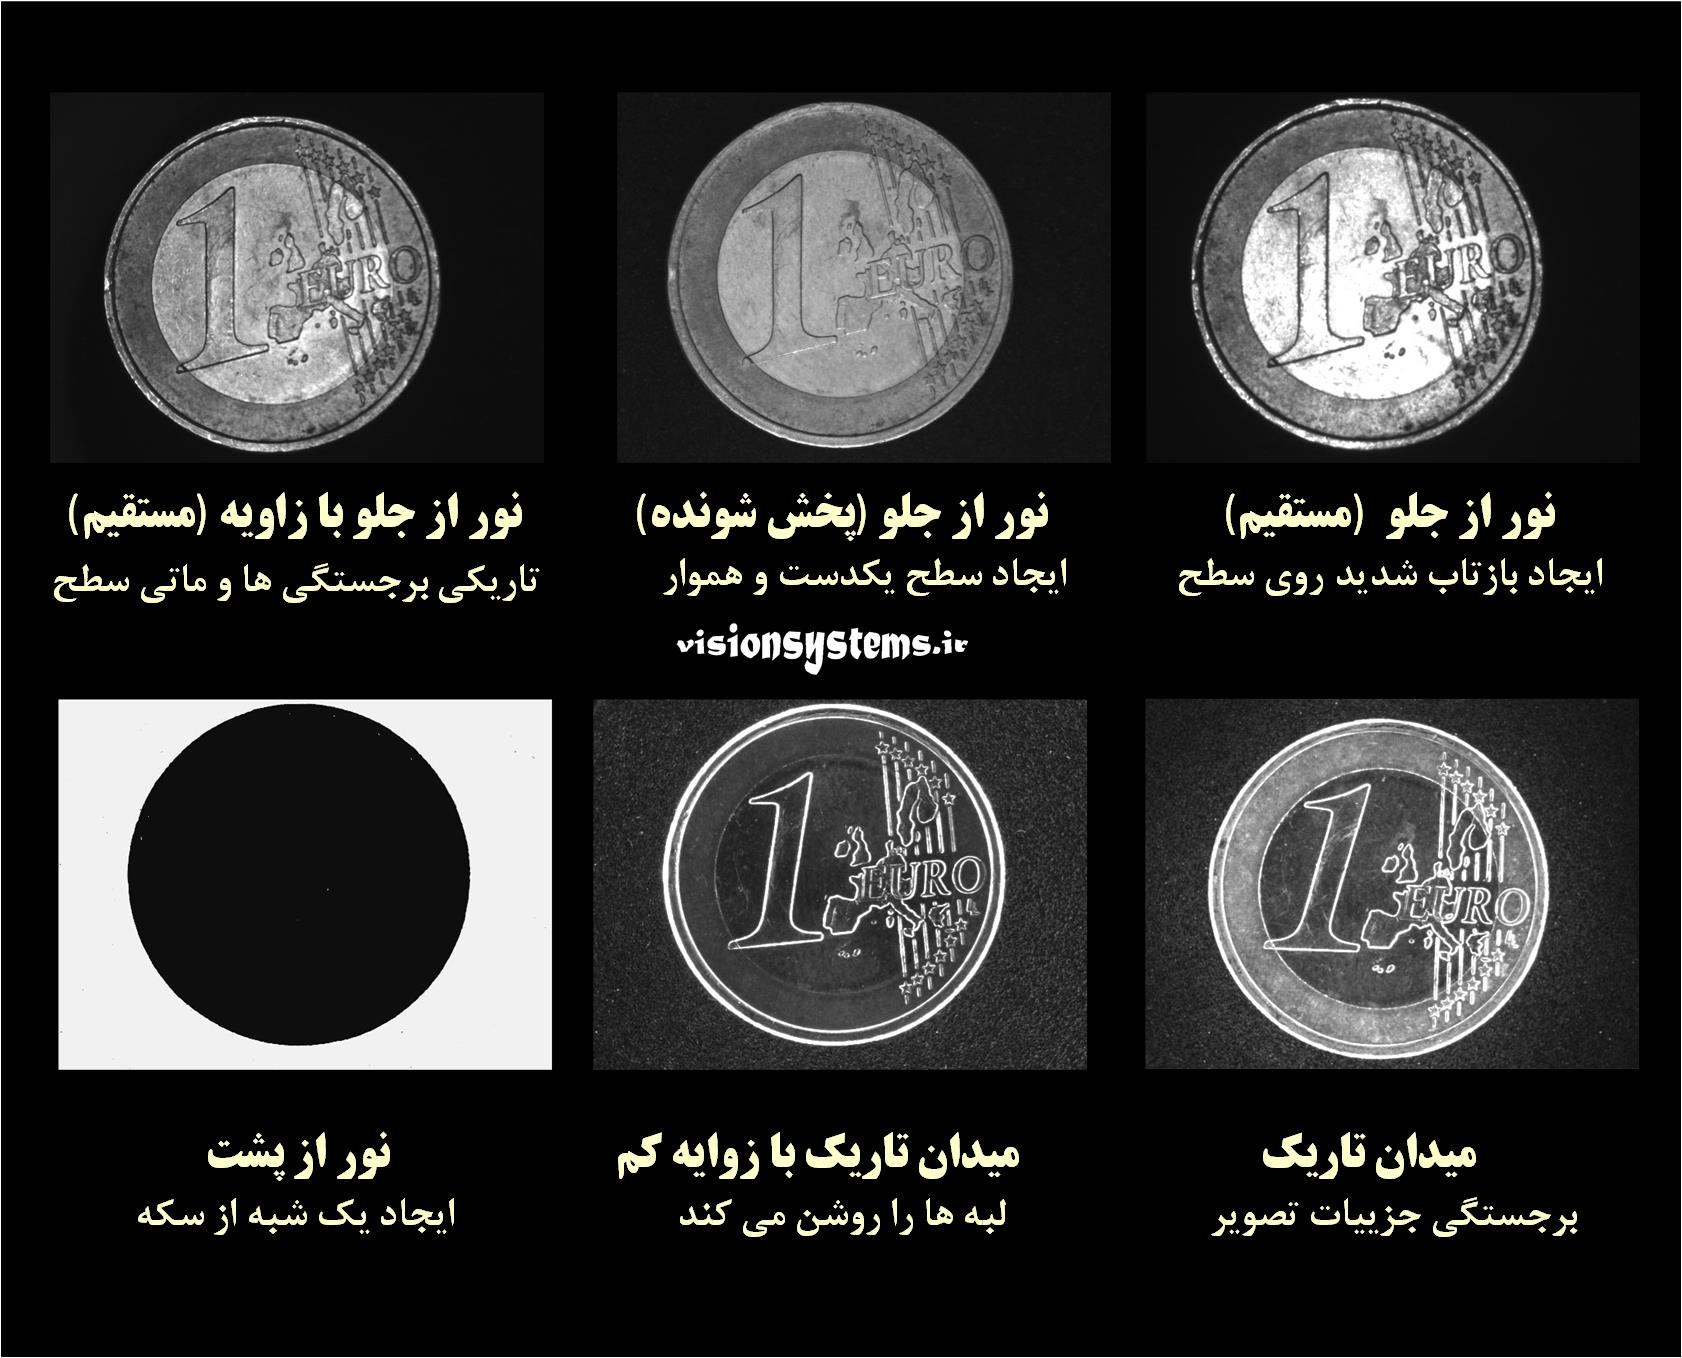
Light from the front (direct)
Direct light from the front causes a strong reflection on the surface and creates very bright areas on the image. As you can see in the image of the coin, this photo is a very bad photo for image processing. Pay attention that the reflection is much higher in metals and shiny objects, and on a matte object with the same conditions, you can get a relatively better image.
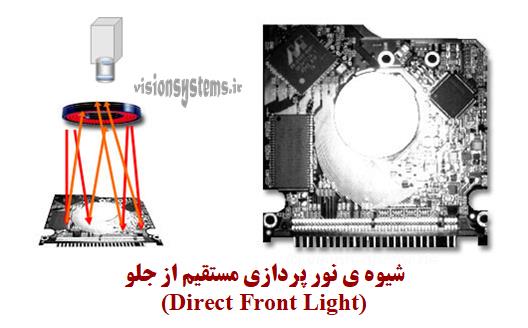
An example of lighting a printed board with a light ring with the method of light from the front (direct) is shown in the image below. In this image, the camera sees the printed board from the middle of the light ring.
Light from the front (broadcast)
Pay attention to the image taken of the coin with diffused light. The light spread on the coin has created a smooth and one-handed image.
Do you think this image is suitable for image processing?
If we want to give a correct answer to this question, we must say that it depends on what is in the fashion imageIt’s up to us. For example, if we want to read a number or an inscription on a coin, this image is not good at all. The ridges of the coin are faded in this photo. But if we want to check the surface, it can be a good image for us.
Light from the front with an angle (straight)
light from the front with an angle; It is similar to the light from the front. The only difference between these two cases is that the angle of light is different in this case. Pay attention to the image of the coin and compare this state with the state of light from the front. Comparing the two images shows us that in the case of using light from the front, the angle of reflection is too low.
Dark field
In dark field lighting, light shines on the object at a much smaller angle. Hence, it causes the edges to protrude. See the image taken of the coin in this state. Highlights in the image such as numbers are displayed with more emphasis. Pay attention that in this case, the surface of the coin is displayed uniformly and darkly.
The figure below shows an example of dark field lighting using a light ring. Look at the figure, the object is placed in such a way that the light shines on it at a slight angle. The result of this type of imaging is the prominence of image features and edges.
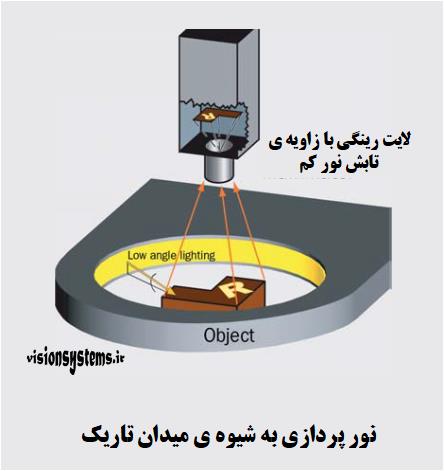
Important note: In dark field lighting, it is very important that the object is in the center of the image. Otherwise, the brightness of the image will not be uniform. For this reason, this type of imaging has received less attention from machine vision and image processing systems.
Dark field with low angle
In low angle dark field imaging, the angle of light incident on the object is greatly reduced (close to zero) and this results in fewer but more distinct edges being displayed in the image. This point can be seen in the image of the coin. In the quality control of some products or parts, we need to shine the light at an angle so that the defects of the product can be identified more. For example, in the quality control of lines and scratches on the surface, the use of dark field can make the protrusion more visible.
By using the back light technique, we can take a ghostly image of the object.
Light from behind or back light
Look at the shape of the coins again. The image of a backlit coin appears as a black circle. By using the back light technique, we can take a ghostly image of the object. In machine vision, this type of lighting has many uses, for example; In dimensional measurement, detecting the presence or absence of an object, glass lighting, checking the liquid level and many other cases.
Now that you are familiar with various lighting methods, practice them. If you don’t have access to professional lights, just use regular LED lights for this. You can even do this using a mobile flashlight. Choose a piece and take a picture of it in different modes using a normal camera or mobile camera and compare the results and send us the photos if you want.
The next step in learning machine vision lights is to know their types. which we discussed in the article 5 user sources of lighting. Also, if you need more specialized information on machine vision systems, we suggest visiting the Doctor Vision.
related content